

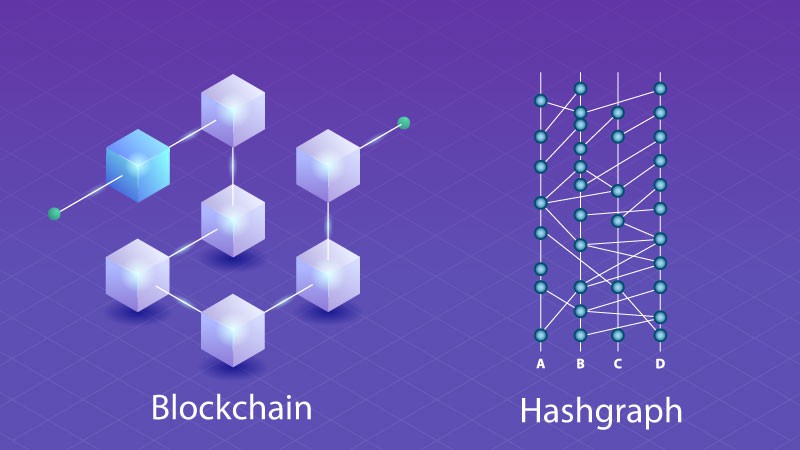
I recently learned about Hedera and found their technology to be quite fascinating. In reality, Hedera is not a blockchain in the sense that it is built on a chain of blocks. It is more akin to a public ledger that employs Hashgraph consensus.
Hashgraph consensus is a more secure and faster alternative to blockchain consensus mechanisms. To paint a clearer picture, think of hedera as a graph, with the speed of verifying transactions increasing as more transactions are added to the network. DAG, which stands for Directed Acyclic Graph, is the technology behind this. DAG is intended to assist Hedera in exceeding 100,000 transactions per second. As a result, it is a legitimate competitor to Visa and other mass-payment systems.
The platform and software that will run on millions of nodes worldwide are governed by a council of 19 multinational corporations from around the world. Instead of mining, nodes on the hashgraph “gossip” with each other, comparing notes on the network’s transaction history.
If you are still unsure about which network to build your next decentralized app on, Hedera may be the best option because it will help you launch your Dapp in a fair, fast, secure, and cost-effective manner. Hedera is the world’s greenest Proof-of-Stake network, and it can help you achieve your environmental sustainability goals by reducing your carbon footprint.
Without further ado let’s dive in straight on how you can start developing on Hedera. For this lesson, I will refer to an article written by Ed Marquez and go into greater detail on it. Here’s a link to the article: https://hedera.com/blog/how-to-develop-on-Hedera-back-to-the-basics
Here is what we are going to be covering.
- ➲ I will be introducing you to the Hedera Portal: Here you will create a testnet account and you will receive fake testnet HBAR. A testnet is simply an instance of the chain to be used for testing and experimentation without risk to real funds or the main chain.
- ➲ How to Configure Your Environment
- ➲ Here I will work you through how to setup the environment on your laptop
- ➲ How to Create Your Account
- ➲ Transferring Hbar
To start with let head to portal.hedera.com. You will be welcomed with the below screen.
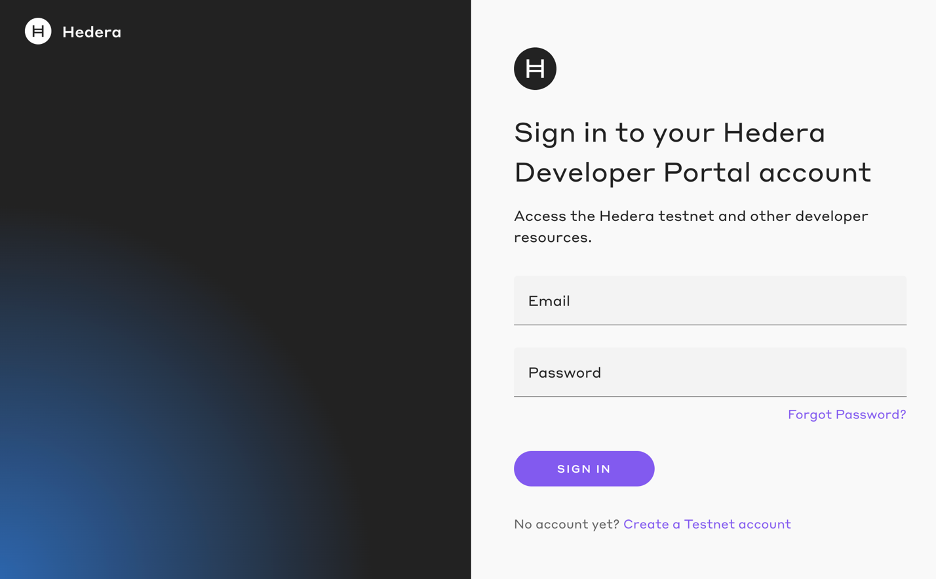
Just below the sign in button, click on “Create a Testnet Account. It will bring up another screen as seen below.
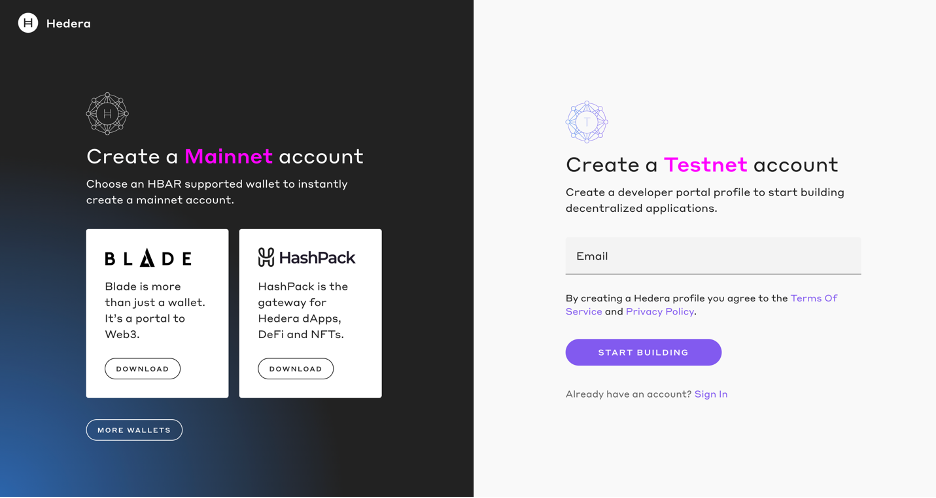
For this lesson, we will be using the Testnet Account. On the right-hand side, input your email and click on “Start building”. A verification code will be sent to your email address. Input the verification code and another windows will prompt you to input your credentials.

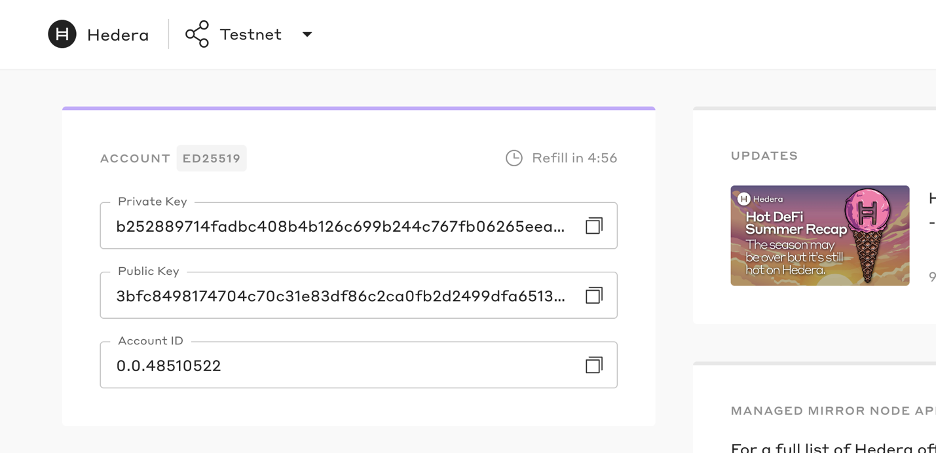
Once you are logged in, you will see the screen below that contains the private key, public key, and your account ID. For the next steps, we will need the private key and the account ID. Copy them.
Now let us head over to our code editor. For this example, we will be using Visual Studio Code.
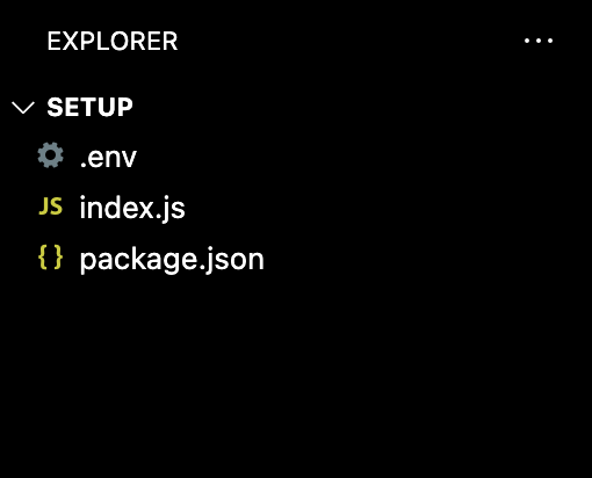
Here, as you can see, I have created a blank project called setup. Now we need to create some files in this setup folder using the terminal window. Open up the terminal windows and follow along.
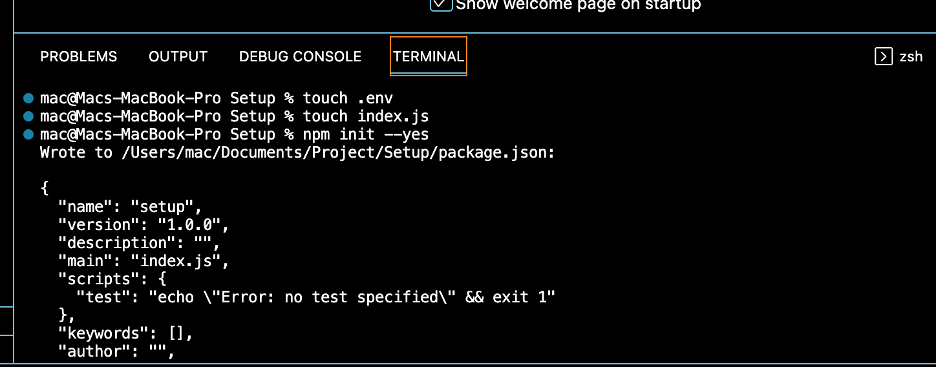
➲ Let’s start by creating our .env file. Type touch .env on the terminal window and hit enter
➲ NB: Make sure that the terminal window is pointed at the setup directory we created. The env file will be used to store the private key and the account ID we copied initially.
➲ We will also be creating an index.js file. Type touch index.js hit enter
➲ After that, we will initialize our repository using the command npm init –yes Hit enter
Now we need access to the Javascript SDK and the .env so let’s install these packages.
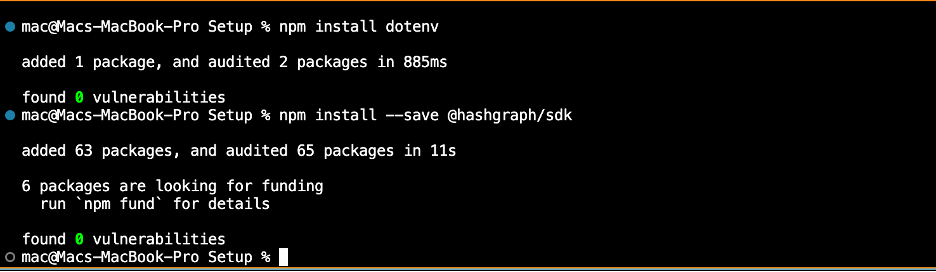
- ➲ To install .env type
npm install dotenvinto the terminal window and hit enter - ➲ To install the Hashgraph SDK type
npm install --save @hashgraph/sdkand hit enter
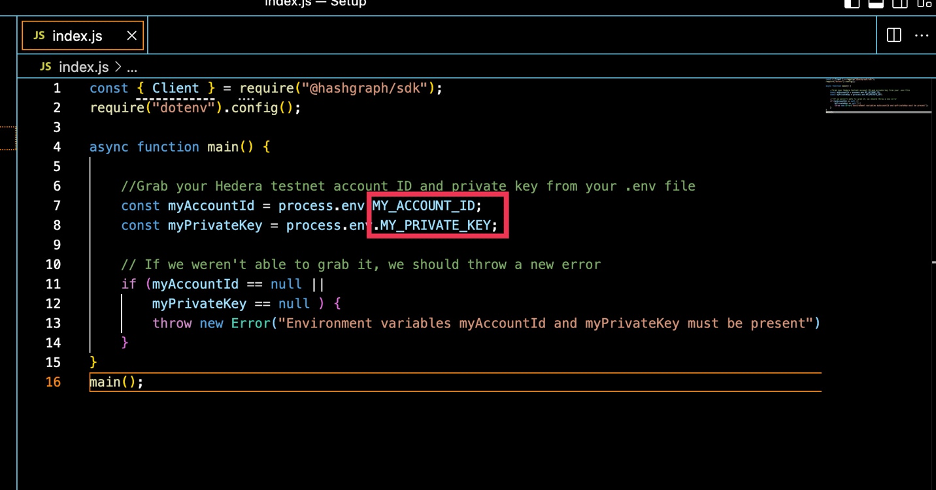
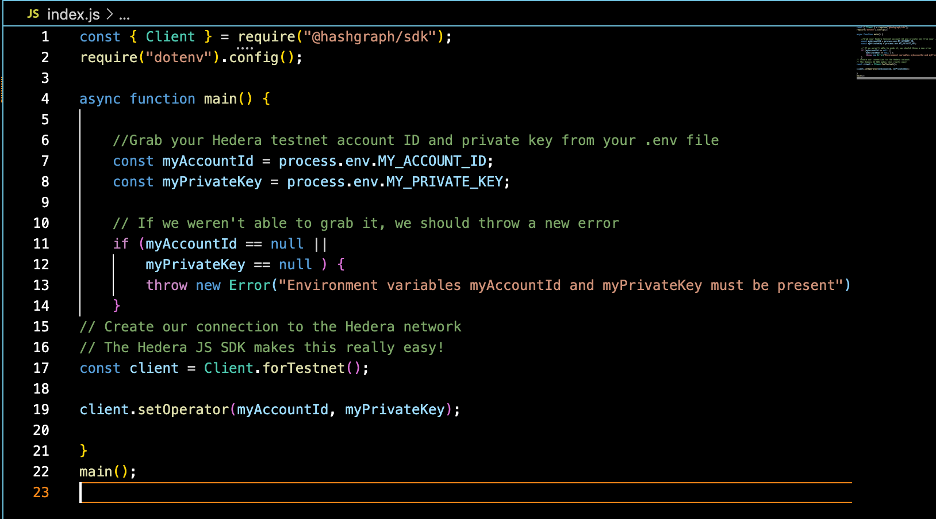
Now the SDK has been install, let start by going into our index.js file and referencing back to the Hedra official docs on environment set up https://docs.hedera.com/guides/getting-started/environment-set-up click on the javascript tab and copy the below code
const { Client } = require("@hashgraph/sdk");
require("dotenv").config();

async function main() {

    //Grab your Hedera testnet account ID and private key from your .env file
    const myAccountId = process.env.MY_ACCOUNT_ID;
    const myPrivateKey = process.env.MY_PRIVATE_KEY;

    // If we weren't able to grab it, we should throw a new error
    if (myAccountId == null ||
        myPrivateKey == null ) {
        throw new Error("Environment variables myAccountId and myPrivateKey must be present");
    }
}
main();
Paste the above code into the index.js file in the code editor.
Now, go back to the documentation on Hedera environment setup copy the code below and paste it in your .env file
MY_ACCOUNT_ID = ENTER YOUR ACCOUNT ID
MY_PRIVATE_KEY = ENTER YOUR PRIVATE KEY
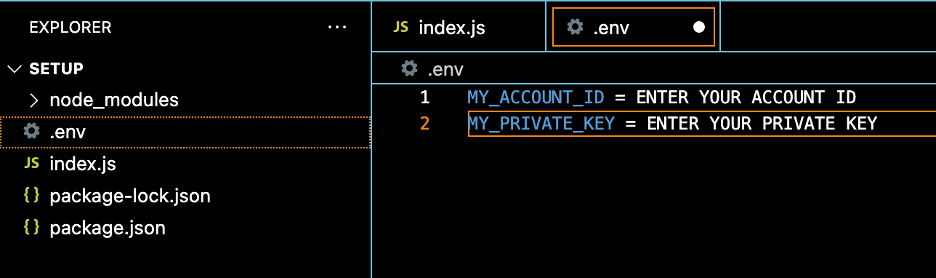
Replace the dummy information with your actual information, which are your account ID and Private Key from your hedera testnet portal.
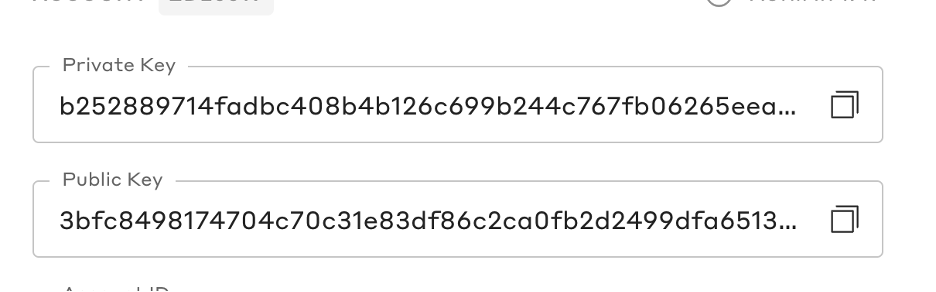
MY_ACCOUNT_ID = "0.0.48510522"
MY_PRIVATE_KEY = "b252889714fadbc408b4b126c699b244c767fb06265eeaba2352c5edb40abf8f"
Now we need to create the client object. The client object will be used to communicate with Hedera Nodes. Since we are using a Hedera testnet account ID and private key, we will create a client for the Hedera testnet. Copy the below code from the Hedera official docs on environment set up https://docs.hedera.com/guides/getting-started/environment-set-up
// Create our connection to the Hedera network
// The Hedera JS SDK makes this really easy!
const client = Client.forTestnet();

client.setOperator(myAccountId, myPrivateKey);
Let’s verify if our code works by adding a quick success message at the end
console.log(wemadeit)
client.close();
Let’s now run the code with node index.js in the terminal windows, this should return the word “wemadeit”

Let’s move on to the third stage which is about creating an account.
For this step lets refer to the create an account section of the Hedera documentation https://docs.hedera.com/guides/getting-started/create-an-account
Here we have to import a couple of updates for our Hedera SDK. Copy the modules under the JavaScript tab in the step 1.
NB (Please don’t copy the second line because we already have the (“dotenv”) configuration and it will be repetition to copy it.)
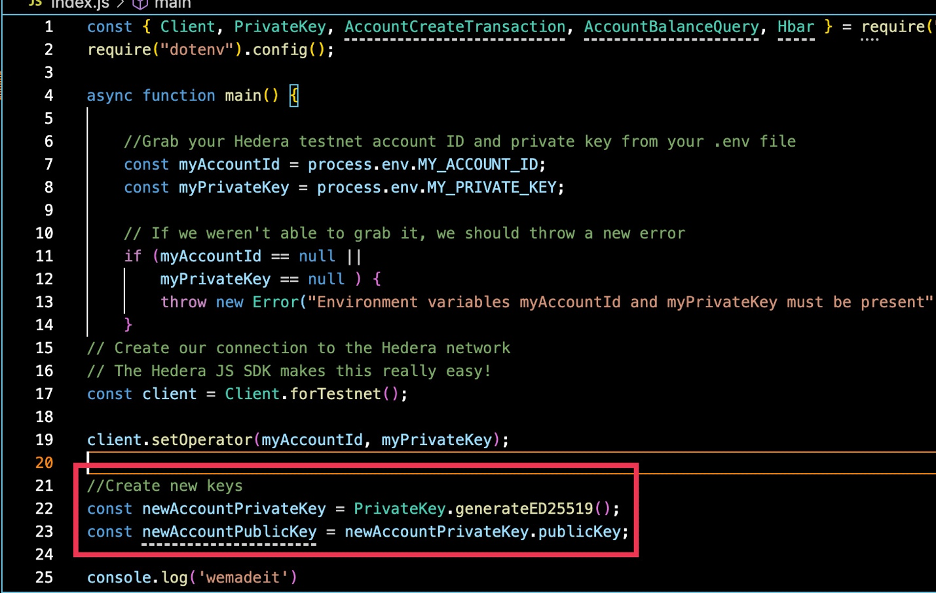
const { Client, PrivateKey, AccountCreateTransaction, AccountBalanceQuery, Hbar }
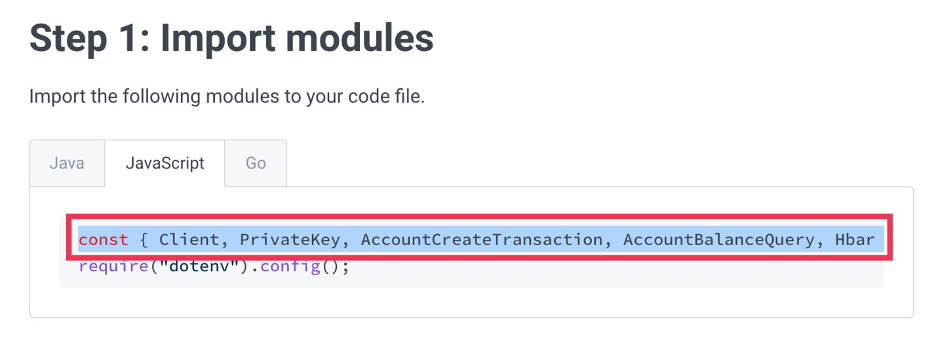
const { Client, PrivateKey, AccountCreateTransaction, AccountBalanceQuery, Hbar } = require("@hashgraph/sdk");
Use the above code to replace the first line of code on the index.js file as seen below

it should look like below

We now have successfully imported the private key, AccountCreateTransaction, AccountBalanceQuery and Hbar. We don’t need the accountbalancequery so we can take that out.
Next, we have to generate some new key to associate to the account you will create. We can do this by using the private key method that we have just imported.
Copy the code in the Step 2: of the “create an account Hedera Documentation“
//const client = Client.forTestnet();
//client.setOperator(myAccountId, myPrivateKey);
//-----------------------<enter code below>--------------------------------------

//Create new keys
const newAccountPrivateKey = PrivateKey.generateED25519();
const newAccountPublicKey = newAccountPrivateKey.publicKey;

Add this code just below the setOperator function. This pair of keys doesn’t exist yet on the testnet. To make the account exist we need to send a transaction to it. Otherwise it will not be recorded by the ledger.
To make the account exist we need to send a transaction to it. Otherwise it will not be recorded by the ledger. To do this copy the code in the “Step 3 of the Hedera create an account documentation https://docs.hedera.com/guides/getting-started/create-an-account
//Create a new account with 1,000 tinybar starting balance
const newAccount = await new AccountCreateTransaction()
    .setKey(newAccountPublicKey)
    .setInitialBalance(Hbar.fromTinybars(1000))
    .execute(client);
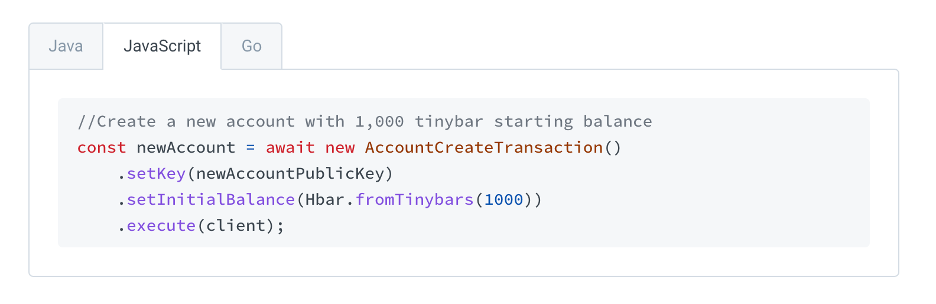
Paste this code directly under create new account code block
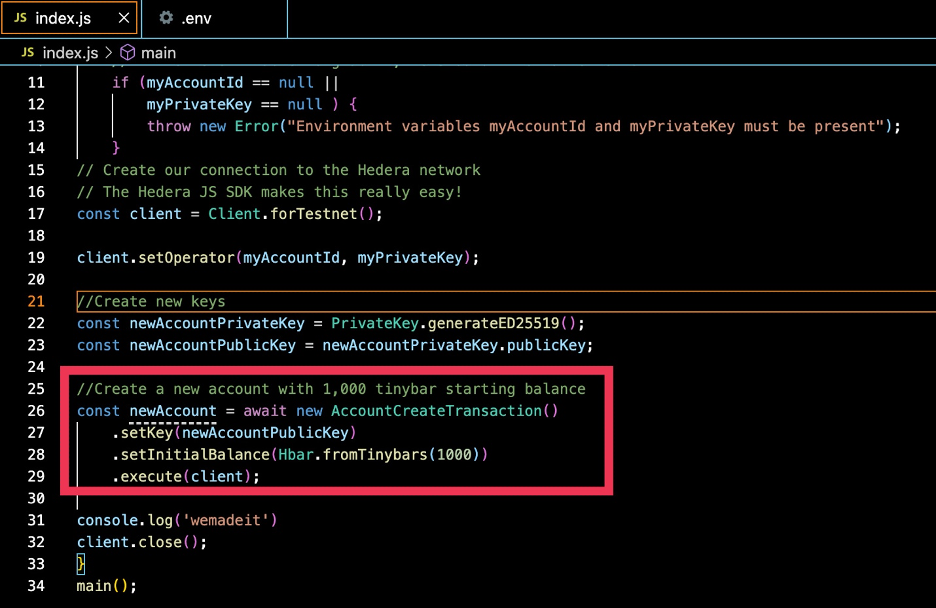
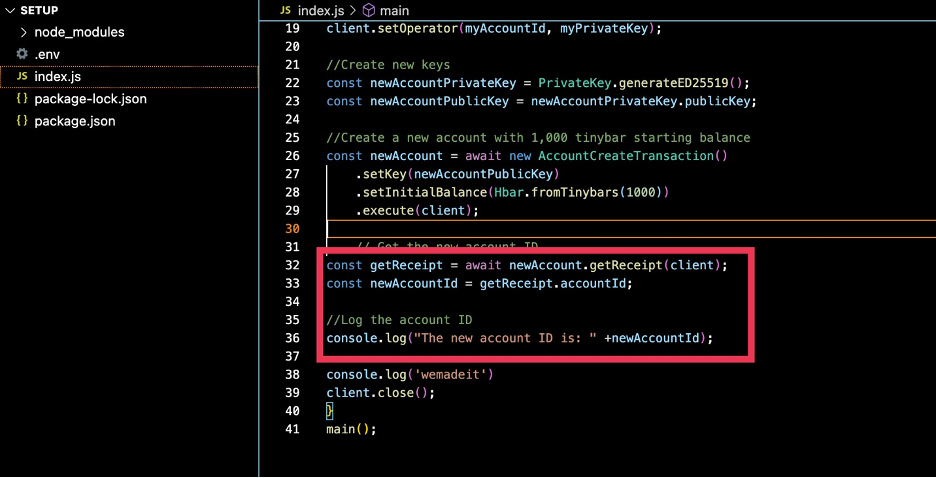
Next, we have to retrieve the account ID, to do this we can start by querying for the receipt. Once a transaction is sent you can always query for the receipt. Then the receipt will contain your new account ID . To do this copy the code in step 4 of the hedera create an account documentation‘
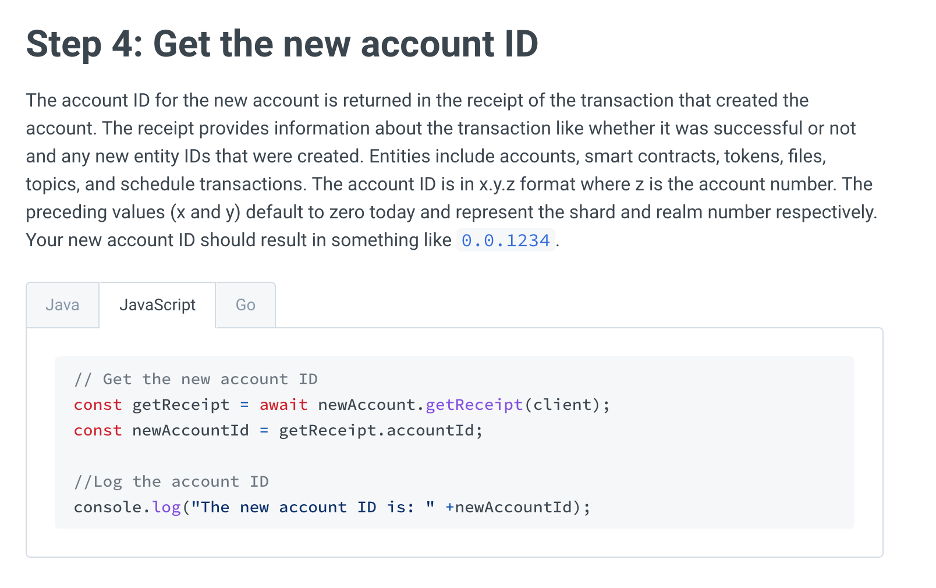
// Get the new account ID
const getReceipt = await newAccount.getReceipt(client);
const newAccountId = getReceipt.accountId;

//Log the account ID
console.log("The new account ID is: " +newAccountId);
Let’s run this code to test if we have successfully created a new account. To do this type the command node index.js at the terminal window

As you can see it returned 0.0.48575754 as our new account ID. Yeah! We madeit
Now we can transfer some Hbar from our Testnet account to the newly created account.
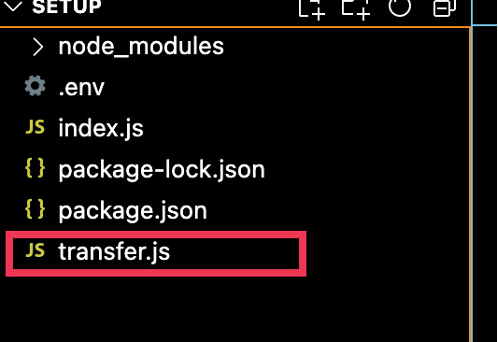
In the next step I will show you how to transfer Hbar. To keep our code clean lets create a new file called transfer.js file
Open the terminal windows and input the command touch transfer.js

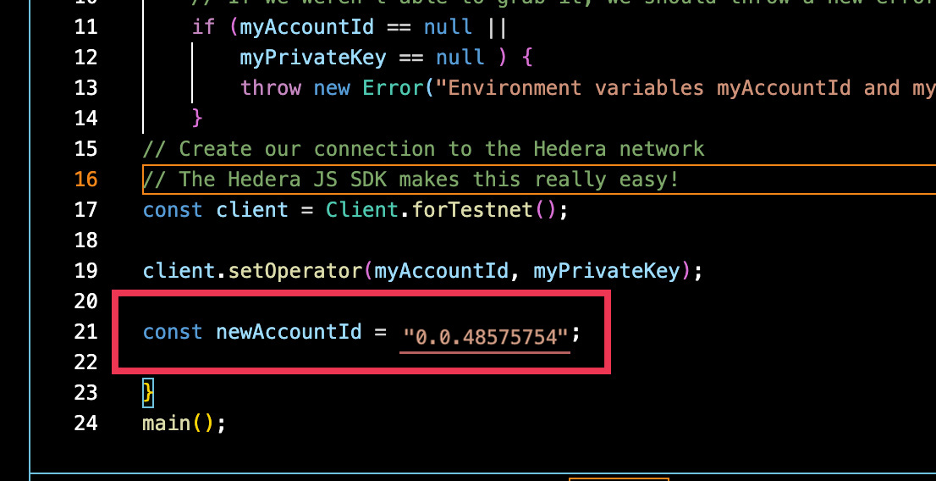
Copy the entire code in your index.js file and paste on the transfer.js file. Remove the code we don’t need, which is basically from the create new key comment to the last.

Now we will need a new account ID, because we want to transfer HBAR into this account. Lets define this as const newAccountId = “0.0.48575754”
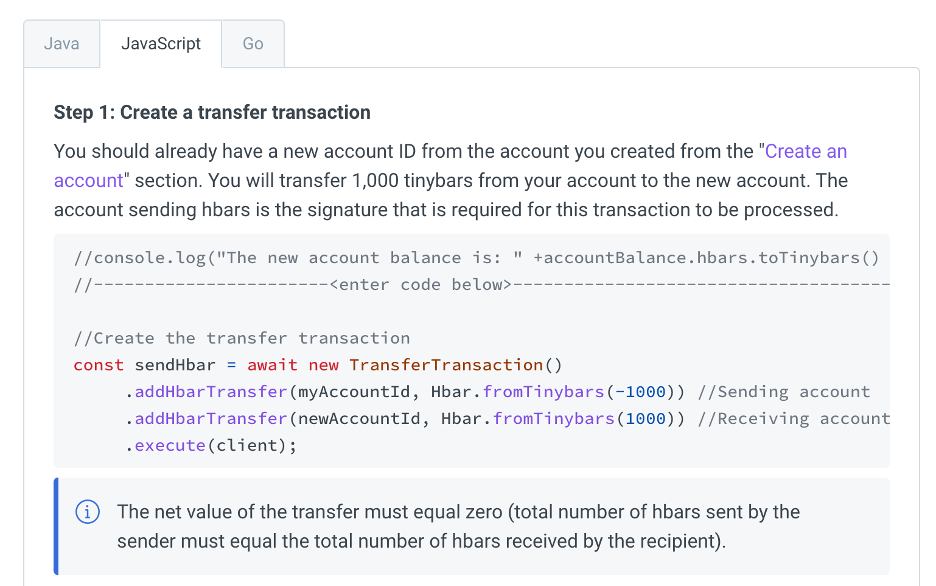
Let’s now refer back to the Transfer HBAR section of the Hedera Documentation. The first step now is to define a transfer transaction. But first let’s Import it from the HederaSDK. (NB: The net value of the transfer must be equal to zero [Total number of Hbars sent by the sender must be equals to the total number of Hbars received by the recipient)
//console.log("The new account balance is: " +accountBalance.hbars.toTinybars() +" tinybar.");
//-----------------------<enter code below>--------------------------------------
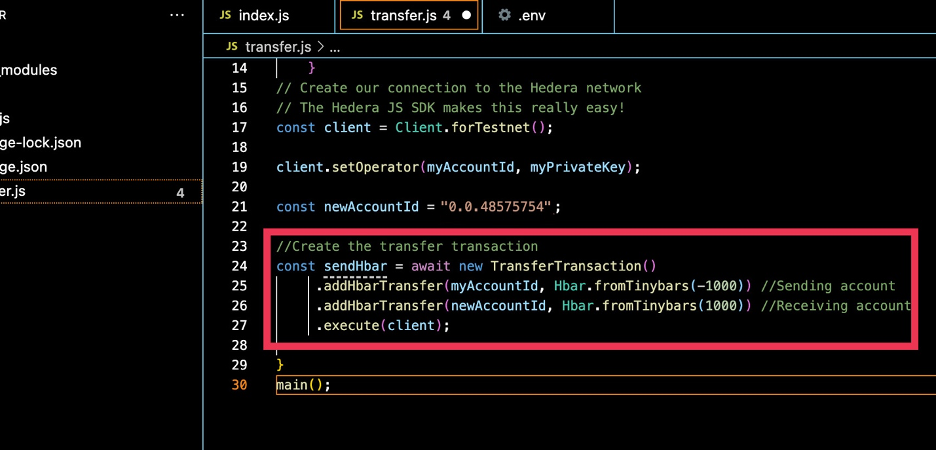
//Create the transfer transaction
const sendHbar = await new TransferTransaction()
.addHbarTransfer(myAccountId, Hbar.fromTinybars(-1000)) //Sending account
.addHbarTransfer(newAccountId, Hbar.fromTinybars(1000)) //Receiving account
.execute(client);
Head over to your editor and paste in the transfer.js file, immediately under the newAccountD as seen below
If we select the Transfer Transaction Text is yellow, this is because we are yet to import it.
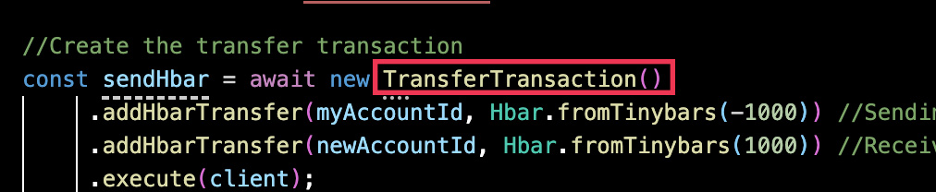
so let’s go ahead and import it. Replace the PrivateKey and AccountCreateTransaction with TransferTransaction,

The TransferTransaction text should turn green after this. Next, lets receive the receipt for this transaction. To do this we can use the below code
const transactionReceipt = await sendHbar.getReceipt(client);
console.log('Status of txn; ${transactionReceipt.status}')
We can also verify the new account balance, but first let’s add the account balance query

We then create new getNewBalance Parameter
This function only accepts one input, in this case the accountID. We want to know the balance for our new accountID
Lastly, we log the output. Using the getNewBalance and then convert to tinybars to make it readable
    const getNewBalance = await new AccountBalanceQuery()
        .setAccountId(newAccountId)
        .execute(client);

    console.log(`New balance: ${getNewBalance.hbar.toTinybars()}`)

    client.close();
To verify the code, open the terminal window and execute the code node transfer.js Success! Now our new balance for this account is 8000

Now let us look up the account on the Testnet Explorer. To do this go to https://hashscan.io
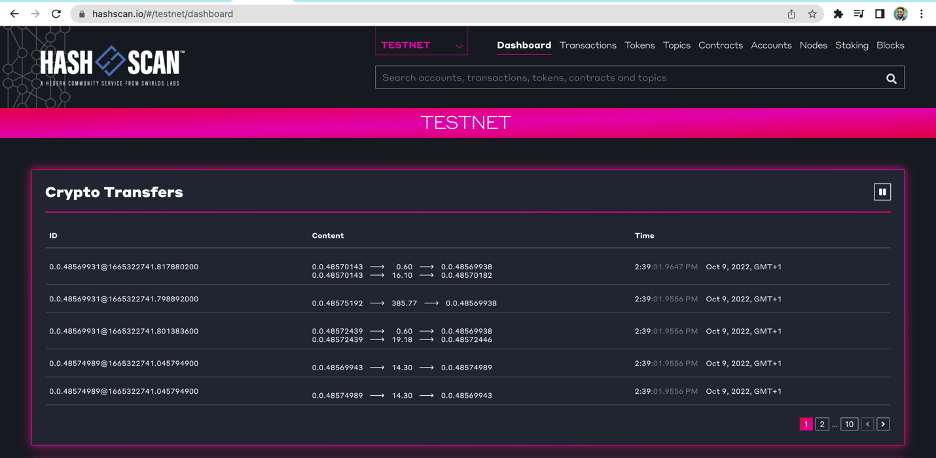
Paste our new AccountID on the search bar
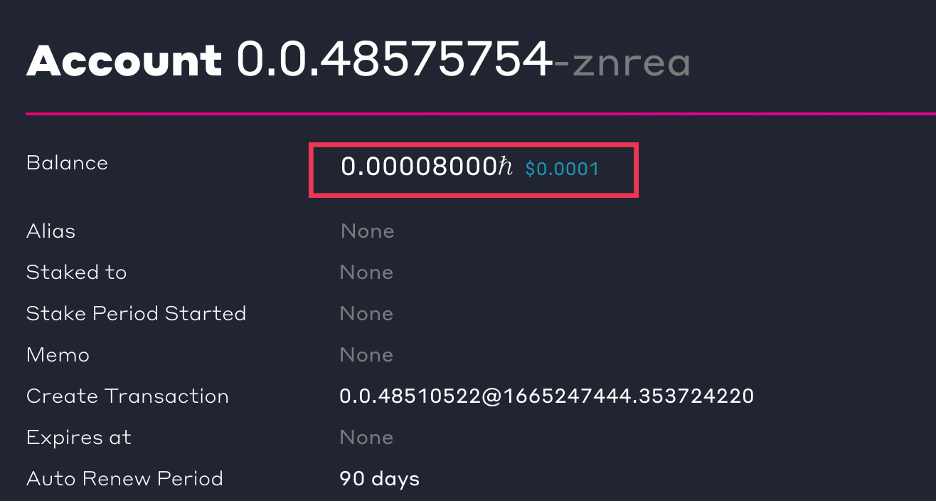
As you can see from the screenshot above, we have a 8000 tinybars (0.00008000h) $0.0001
To learn more about Hedera, I suggest you visit the Hedera Blog https://hedera.com/blog and the Hedera Documentation https://docs.hedera.com/. A good place to start is the try example section https://docs.hedera.com/guides/getting-started/try-examples, Here you will learn how to
- ➲Create and Transfer Your First NFT
- ➲Create and transfer your first fungible token
- ➲Submit your first message
- ➲Deploy your first smart contract
- ➲Deploy a contract using the Hedera Token Service
- ➲Create and transfer an NFT using solidity contract
- ➲Schedule your first transaction